tlbimp error TI1027

I could not find a single source of information about this error, not even in Microsoft docs.
Here is a scenario I encountered that caused this error – took a lot of work to figure out the root cause.

  • Have two COM projects A & B, both running tlbimp as a post-build event.
  • in project A, add /asmversion:1.2.3.4 to the tlbimp command line – this is the root cause
  • compile project A -> will generate A.dll and ALib.dll
  • compile project B -> will generate B.dll, and will fail generating BLib.dll with error TI1027

There are two ways to solve this error:

  • Option 1 – remove the /asmversion command-line parameter, if you can.
  • Option 2 – add /reference:<path to ALib.dll> to the tlbimp command-line of project B.

I’m not really sure why Option 2 works, but it does… if you have an explanation feel free to comment!

Using Python to Restore JIRA Custom Field Values from Issue History

Consider the following scenario: you move a bunch of issues from one type to another, or from one project to another. You don’t pay much attention and just confirm everything. Only then you find out some custom fields are gone and the data is lost – since the field context does not include the new issue type or project.

Don’t panic! no need to rush to restore the entire instance database from backup! The data is still visible in the issue’s History tab. All you need to do is fix the context of the fields and then restore it from the issue history. In this post I share some Python code (using python-jira module) to help you achieve that.

Step 1: Fix the field’s context

This better be done manually and carefully, if your policy is to maintain strict field configuration (which in general is a good idea since it improves Jira performance).

Go to administration > issues > custom fields and for each “lost” field which you wish to restore, click the cog icon > ‘Configure’ and then ‘Edit Configuration’. Set the proper issue types and projects.

Step 2: Prepare the restoration script

Now let’s prepare a python script to get a single issue key and collects the lost data from the issue history

Step 2a – Connect to JIRA and obtain the issue

# Connect to JIRA
from jira.client import JIRA
jira = JIRA({'server': jira_server_url}, basic_auth=(username, password)

# create mapping for custom field names and types
name_map = dict()
type_map = dict()
for field in jira.fields():
    if field['custom']:
        fname = get_current_field_name(field['name'])
        name_map[fname] = field['id']
        type_map[fname] = field['schema']['type']

# get the issue object - note the 'changelog' setting
issue = jira.issue(issue_key, expand='changelog')

Step 2b – Look for the lost fields in the history and get their original values

# get the values of the lost fields from the history entry where they got nullified
lost_fields = ['field 1', 'field 2']
original_value = dict()
for history in issue.changelog.histories:
    for item in history.items:
        field_name = item.field
        if field_name in lost_fields and not item.toString:
            # get the previous field value - in two forms, see below
            field_value_str = getattr(item, "fromString")  # string value
            field_value = getattr(item, "from")  # raw value (empty for string-based fields)
            field_type = type_map[field_name]
            if field_type == 'datetime':  # need to add milliseconds
                original_value[field_name] = field_value.replace('+', '.000+')
            elif field_type == 'user':  # username
                original_value[field_name] = field_value
            elif field_type == 'group':  # appears as array but we need it as string
                original_value[field_name] = field_value_str.replace('[', '').replace(']', '')
            elif field_type == 'array' and field_value:  # convert to python array - not using "eval" to avoid weird/malicious strings.
                original_value[field_name] = field_value_str.split(',')
            else:
                original_value[field_name] = field_value_str
               

Now debug/test the script on different issues to make sure it can handle the various fields and values you have. If you encounter an exception – most likely the field configuration is not correct, so double-check what you did in step 1.

Step 3 – Add code to restore the collected data

Go over the list of values we collected and update the issue with them. We need to update differently based on the field items, Jira’s REST API is anything but unified… some useful examples can be found here.

Note – we do not update fields which are not empty (e.g. someone re-entered them manually).

fields_to_update = dict()
for field_name in original_value.keys():
    field_real_name = name_map[field_name]
    field_type = type_map[field_name]
    # don't update a field which now has a value
    curr_value = getattr(issue.fields, field_real_name)
    if curr_value is None:
        value = values[field_name]
        if field_type == 'number':
            fields_to_update[field_real_name] = int(value)
        elif field_type in ['string', 'datetime']:
            fields_to_update[field_real_name] = value
        elif field_type in ['user', 'group', 'version']:
            fields_to_update[field_real_name] = {'name': value}
        elif field_type in ['array']:
            # for multi-version pickers, need to use [{'name': x} for x in value] 
            fields_to_update[field_real_name] = [{'value': x} for x in value]
        else:
            fields_to_update[field_real_name] = {'value': value}
        # useful debug print if needed. Helps comparing the outcome against the official REST API.
        # print("Adding {}({},{}) -> {}".format(field_name, field_real_name, field_type, fields_to_update[field_real_name]))
# now update the issue
if fields_to_update:
    try:
        print("Updating issue " + issue.key)
        issue.update(fields=fields_to_update)
    except Exception as e:
        print("{}: FAILED: {}".format(issue.key, e))
else:
    print("{}: Nothing to update".format(issue.key))

That’s it! Run it on the affected issues and everything’s back to normal.

Tip – if you’re going to run this script on a bunch of issues, I highly recommend to disable email notifications in your Jira instance beforehand 🙂

Enable TFS 2018 Code search on multiple branches

TFS Code search is a great feature. Our developers love it; they can easily search for anything within the millions lines of code we have in our various repos.

However, by default, this feature works only on the repo’s default branch. This can be nice for a general-purpose search, but when working on multiple branches with considerable differences between them, it is not good enough.

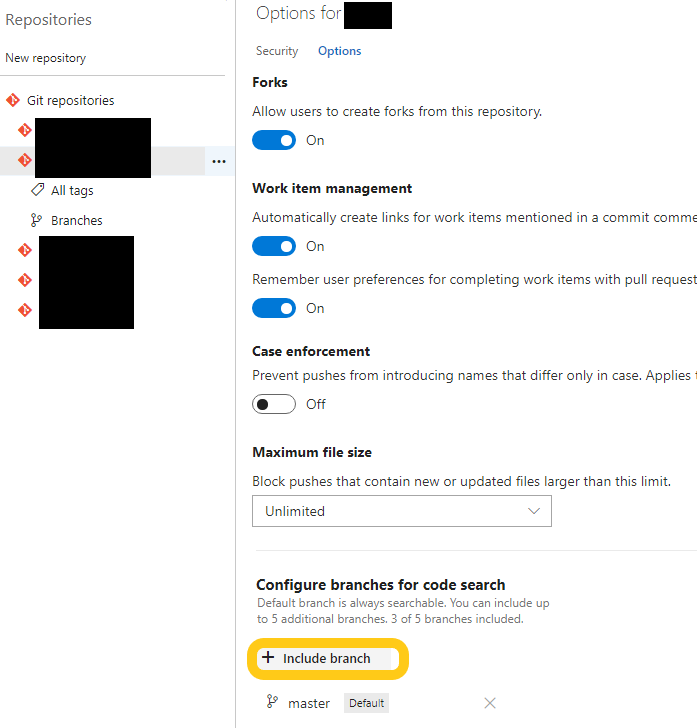
It took a lot of digging to find out that you can add up to 5 additional branches to be included in the code search. Go to the project’s settings > Version Control > select the repo and go to the Options tab. there you will find this well-hidden option.

Adding branches should trigger auomtatic re-indexing of the repository. To monitor the status, or force re-indexing in case of need, see the Code Search Admin page.

Merge from master overrides a revert commit

First time I encounter a Git behavior which, on first look, seems to defy common sense.

Scenario:
1. create a feature branch off master
2. perform some changes and commit (in this example – add a new line to foo.c)
3. merge the changes to master using a pull request with squash
4. on the feature branch, revert the previous commit (in this example – remove the line from foo.c)
5. merge master to the feature branch

One would expect that the reverted content will remain or that at least a manual merge conflict will occur. But surprise – the merge overrides them with the content on master (the content before the revert).

So why it happens? because how three-way merge works when there is a single common ancestor.

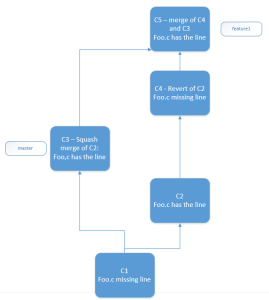
In the diagram, you can see that C1 is the common ancestor of C3 and C4. When doing the merge, git compares C4 to C1 and C3 to C1.
Since C1 and C4 are identical, it causes git to “understand” that the feature branch did not change the file at all, so it should take the change introduced in C3 and apply it as the merge result.

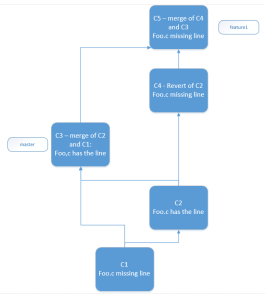
How it differs from a regular (non squashed) merge?

In this case, the common ancestor changes. It is now C2. So git compares C2 and C3, find that they are identical, hence selecting the change between C2 and C4 as the “interesting” change to apply as the merge result.


Conclusion: if you merge with squash, do not use the same branch to introduce additional changes…


JIRA Pre-Upgrade check – call for votes

Let’s start with a bottom line: if you’re a JIRA user, please take a few seconds to vote for the ‘JIRA Pre-Upgrade check’ suggestion

Now for the whole story:

Recently we upgraded one of our JIRA instances. It all seems well at first and then small problems started to pile up.

After contacting Atlassian support, it turns out we should have upgraded our database server (Oracle in this case) before the upgrade (“it’s in the documentation!”). We didn’t, so some data upgrade tasks silently failed, without any notification during or after the upgrade process.

I was surprised. As a long-time installation developer I learned one thing: users don’t read the documentation until they have problems. They certainly don’t read installation guides; at most they skim through the release notes. That’s why every installation I create includes some basic validations regarding the environment (e.g. OS, database, Java…).

So, I suggested Atlassian to add this kind of checks to their own installer and they immediately agreed. All that’s left is to gather enough votes so it would go into their suggestion review process. Appreciate your help!

JIRA Tip: issues showing on Kanban board but missing on Scrum board

Let’s say you have two JIRA projects, project K using a Kanban board and project S using a Scrum board. Each project with its own set of statuses and workflows.

Now, users of project S want to see issues from project K on their Scrum board. They update the board filter accordingly, but to their surprise, many project K issues are not  visible in the Backlog.

Why? because a JIRA board (either Scrum or Kanban) only shows issues whose statuses are mapped to the board’s columns (e.g. To Do, In Progress, Done).
Issues with unmapped status are not displayed on the board at all. This is useful in some scenarios but confusing in others, such as in the example above.

To remedy the situation, go to the Scrum board’s configuration, and under the ‘Columns’ sections you can map or unmap statuses as you see fit.

Quick tip: Using Python’s expandvars() with quoted variables on Windows

I recently encountered an elusive bug, which eventually I tracked down to the fact that environment variables are not replaced in a certain string even though it is set by calling os.path.expandvars(original string).

Turns out, the problem is that expandvars() doesn’t expand variables who are enclosed within a string literal. I couldn’t find it documented anywhere but facts are, this is the case.

Small example:

>>> import os
>>> os.environ['VAR1'] = 'Value1'
>>> s1 = "this is '%VAR1%'"
>>> os.path.expandvars(s1)
"this is '%VAR1%'"
>>> s2 = "this is %VAR1%"
>>> os.path.expandvars(s2)
'this is Value1'

It may be a good idea in some cases, but for me it was quite an annoyance.

So, how to overcome this?

Continue reading

Running Python Unit Test in a VSTS/TFS build

Here’s a short explanation how to execute python unit tests during VSTS/TFS builds, without the need of plug-ins. The basic idea is to create a JUnit XML from your test results, and then have it published to the TFS build dashboard.

First, on the relevant build agent(s), install the pytest module. You can use the following command, or your favorite CM tool.

python -m pip install pytest

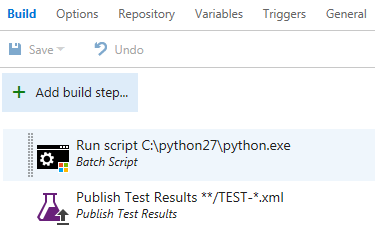
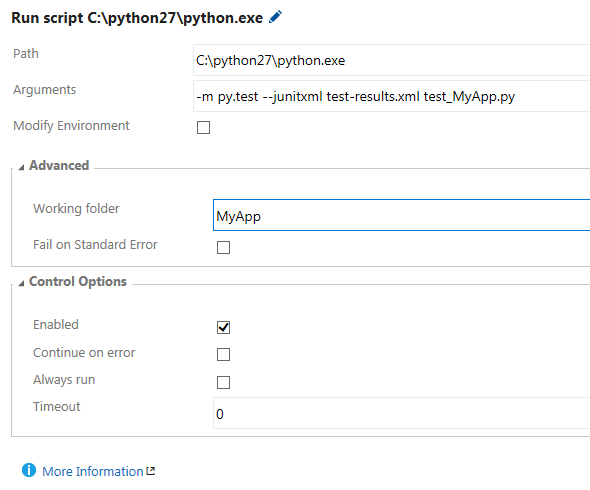
Next, edit your build definition in TFS, and add two build steps: one (Batch Script) for running py.test to generate a junit XML, and one (Publish Test Results) for publishing the xml to the test results page.
The full command line to run the tests is as follows (in this example, the unittest code is in test_MyApp.py):

python -m py.test --junitxml test-results.xml test_MyApp.py

Here is a sample build definition which includes only those two steps:

BuildSteps

Build Steps

BatchScript

Batch Script Settings


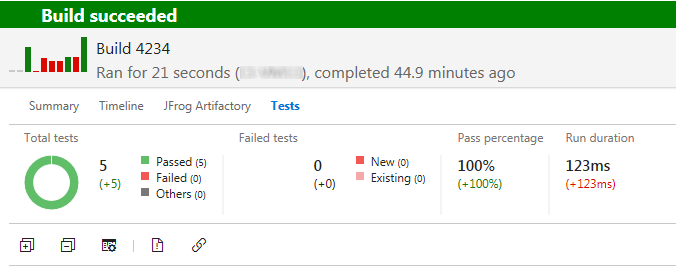
Finally, queue the build, and you will able to see the test results in the build page:

TestResults


InstallShield: Where is the ‘Create New Folder’ button when browsing?

InstallShield users may have noticed that, in all the ‘select folder’ type dialogs, there is no ‘Create New Folder’ button. If the user wants to create one, he can only do it from Windows itself, or (in some dialogs) type it as text. This is because all these dialogs call the SelectDir() function when clicking Browse.

This is of course very inconvenient, I saw several uses complain about it, but the situation remains.

I came up with a solution, inspired by this KB Article (how to browse for files in InstallScript). Basically I created my own version of AskDestPath() dialog, and modified the behavior so when clicking Browse it will call a custom function i wrote, based on Windows API SHBrowseForFolder().

You can find the custom function on my GitHub here.

The only issue I have is that I cannot set the initial folder. This is a known drawback of this specific API function, and there is a known C++ workaround – but it cannot apply to InstallShield since it does not support pointers to functions (it crashes if you try).

ClearCase Windows Quick Tip: Find all symbolic links

Our ClearCase repository make heavy use of ClearCase symbolic links. We began an initiative to get rid of them, since they cause lots of problems – from snapshot view size, to tools not supporting them (e.g. WebPack), and Git migration efforts. See also my previous post on this matter.

The first step, of course, is to find all of them. One may think that cleartool find command will provide this functionality, but it’s lackcing. So we came up with this simple command-line:

cleartool ls -l -r <folder> | findstr /C:"symbolic link"

Folder must be a VOB, or a folder inside a VOB. To iterate on all VOBs, you can run:

for /d %i in (<view root>\*) do @cleartool ls -l -r %i | findstr /C:"symbolic link"

Now, we just need to figure out what to do with all of them…